Knowing how to pack a kitchen for moving is one of the most demanding challenges in any relocation. At first glance the kitchen looks manageable — a few cabinets, a pantry, and some appliances. But once you begin pulling everything out, the true scope reveals itself: stacks of dishes, fragile glassware, heavy cast iron, sharp knives, small appliances with cords and attachments, an assortment of pantry staples, and a refrigerator that needs to be emptied and defrosted before the truck arrives. Pack it without a clear plan and you risk broken dishes, damaged appliances, leaking pantry items, and boxes so heavy the movers cannot safely lift them.
Why the Kitchen Requires Its Own Packing Strategy
The kitchen is typically the most time-consuming room in any home to pack — and the one most likely to generate surprises when people underestimate how much is actually stored there. Unlike bedrooms, where the categories are fairly straightforward, the kitchen blends fragile items, heavy items, perishables, and hazardous cleaning chemicals all within the same few square feet of cabinet space.
There are four specific reasons kitchen packing goes wrong more often than people expect:
- Fragile dishware and glassware: Plates, bowls, mugs, wine glasses, and baking dishes are among the most breakable items in any home. They require individual wrapping, careful box orientation, and proper padding — steps that are easy to skip when you are tired and behind schedule.
- Weight distribution problems: Kitchen items are dense. Cast iron pans, canned goods, and stoneware can make a box dangerously heavy before it is even half full. Overpacked boxes break, injure movers, and damage the items inside.
- Perishables and pantry items: Food cannot simply be thrown into boxes. Opened packages spill, glass jars break, and perishables cannot travel in a sealed truck. Deciding what to use up, donate, or transport requires planning well in advance of moving day.
- Appliances with multiple components: Stand mixers, blenders, food processors, and coffee makers all have detachable parts, cords, and accessories. Packing them without a system results in components arriving in the wrong boxes and reassembly becoming a lengthy puzzle.
Working through the kitchen zone by zone — pantry first, then dishes and glassware, then cookware, then appliances, then the refrigerator last — keeps the process manageable and ensures nothing is overlooked on moving day.
Step One: Declutter and Audit Your Kitchen Before Packing Anything
Before you pull a single cabinet door open with packing tape in hand, spend time sorting through what you actually want to bring. Moving is the single best opportunity to reduce kitchen clutter, and items you do not pack are items you do not have to wrap, carry, or unpack.
Questions to Ask About Every Kitchen Item
- Have I used this in the past year? Specialty gadgets, duplicate tools, and appliances that never leave the cabinet are strong candidates for donation.
- Is it in good condition? Chipped dishes, cracked mugs, and scratched nonstick pans are not worth the effort of packing and unpacking.
- Do I have too many of this category? Most households have more spatulas, wooden spoons, and mismatched storage containers than they will ever need.
- Will it fit the new kitchen? If you are moving from a large home to a smaller one, this is the time to be realistic about cabinet space.
Donate usable items to a local food pantry or kitchen-focused charity. Dispose of anything broken, expired, or beyond use. The goal is to begin packing only what genuinely earns a place in your new home.
Step Two: Gather the Right Packing Supplies
The kitchen demands more packing material than almost any other room. Cutting corners on supplies here directly increases the risk of broken items. Before you begin wrapping a single dish, make sure you have everything you need on hand.
Essential Kitchen Packing Supplies
- Dish boxes (also called dish packs): These are heavy-duty double-walled boxes specifically designed for kitchen items. They provide significantly more protection than standard moving boxes and are worth the investment for your most fragile items.
- Packing paper: Unprinted newsprint is the workhorse of kitchen packing. Use it to wrap individual dishes, line box bottoms, and fill empty space. Avoid printed newspaper — the ink transfers and stains.
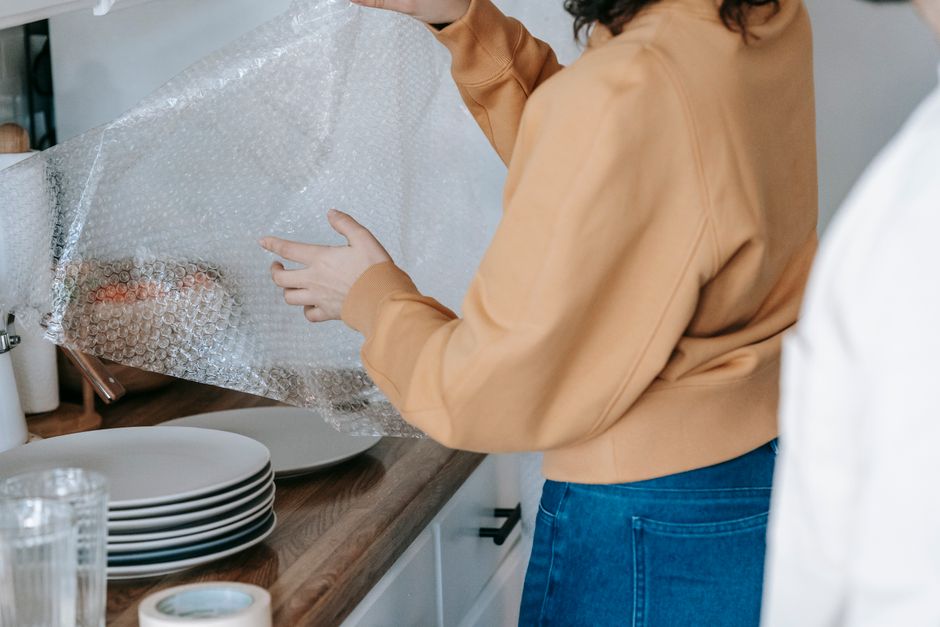
- Bubble wrap: Reserve bubble wrap for your most fragile pieces — crystal, stemware, and heirloom dishware that cannot be replaced.
- Small and medium boxes only: Never use large boxes for kitchen items. The weight accumulates too quickly. Small boxes for heavy items like cast iron and canned goods; medium boxes for dishes and cookware.
- Packing tape and a quality tape gun: The bottom of every box needs to be double-taped before loading. A tape gun makes this much faster than using tape by hand.
- Permanent markers: Label every box clearly with its contents and the destination room. Add FRAGILE on all sides for dishware boxes, not just the top.
- Cell dividers and dish divider kits: These cardboard grid inserts, available from moving supply stores, hold glasses and stemware individually and dramatically reduce breakage risk.
Step Three: Pack the Pantry First
The pantry should be your first packing project, started two to three weeks before your move date. Pantry items are not fragile, so they do not require the careful technique of dishware packing, but they do require planning around what you will eat in the weeks leading up to the move.
How to Work Through Your Pantry
- Stop buying in bulk immediately: As soon as your move is confirmed, stop restocking large quantities of any pantry staple. Your goal is to cook down what you have, not pack it.
- Sort into three groups: Use it before you move, donate unopened non-perishables to a food bank, or pack and transport. Only sealed, non-perishable items in their original packaging belong in the third group.
- Pack pantry items in small boxes: Canned goods are extremely heavy. A box of twelve cans can easily exceed fifty pounds. Use small boxes and distribute weight evenly.
- Seal opened packages: Any opened dry goods — pasta, rice, cereal — should be transferred to zip-lock bags before packing to prevent spills. Better yet, plan to use them up before the move.
- Do not pack condiments and oils: Opened bottles of olive oil, vinegar, salad dressing, and similar liquids are prone to leaking in a warm truck. Dispose of open bottles and replace them after you arrive.
- Never pack anything that requires refrigeration: Perishables cannot travel safely in a moving truck. Plan your final grocery shopping carefully so your refrigerator is as empty as possible by moving day.
Step Four: Wrap and Pack Dishes and Glassware
Dishes and glassware require the most technique and the most time of any kitchen packing category. Approach this section methodically — rushing it is the most common reason kitchenware arrives broken.
The Right Way to Pack Plates and Bowls
- Wrap each plate individually in two to three sheets of packing paper. Place the plate in the center of your paper stack, fold the sides over, and roll it forward to secure.
- Pack plates vertically on their edge, not stacked flat. Plates packed on their edge have significantly less surface area in contact with the box walls, which reduces the force transferred during impact. This is counterintuitive but critical.
- Line the bottom of your dish box with at least three inches of crumpled packing paper before placing any dishes inside. Add a layer of crumpled paper between each row of plates.
- Fill every empty space in the box. A box that shifts and rattles during transport is a box that will produce broken dishes. Stuff paper into every gap until the contents feel snug and immovable.
- Bowls can be nested in groups of two to three with paper between each one, then wrapped as a bundle. Stack bowl bundles on their sides rather than flat.
The Right Way to Pack Glasses and Stemware
- Use cell dividers in your dish box if possible. Each glass gets its own compartment, which eliminates glass-to-glass contact entirely.
- If you do not have dividers, wrap each glass individually, starting at the base and rolling toward the rim. Tuck paper inside the glass before wrapping the outside.
- Wine glasses and stemware are best wrapped in bubble wrap in addition to packing paper. The stem is the most vulnerable point — make sure it is well padded.
- Pack glasses upright, never on their sides. Place the heaviest glasses on the bottom layer and lighter, more delicate pieces on top.
- Never stack a second layer of glasses directly on top of the first layer without a substantial padding barrier between them.
Step Five: Pack Pots, Pans, and Cookware
Cookware is durable but heavy, and improper packing can damage nonstick coatings, handles, and lids. A few techniques make a significant difference.
- Nest pots inside one another with paper between each piece to prevent scratching. This saves space and keeps the stack stable inside the box.
- Pack lids separately — either on their edge in the same box or in a separate medium box. Lids packed flat and stacked directly on top of pots are prone to cracking if the box is compressed.
- Wrap cast iron individually and pack it at the bottom of a small box. Cast iron is extremely heavy — do not put more than two pieces in a single box. Label the box HEAVY on all sides.
- Protect nonstick surfaces: Place a layer of packing paper or a folded dish towel between every nonstick pan to prevent the coating from being scratched during transport.
- Pack handles with awareness: Long pan handles can puncture through box walls. Orient pans so handles point toward the center of the box, not toward the sides.
Step Six: Pack Knives and Bakeware Safely
Knives and sharp kitchen tools are a safety hazard if packed carelessly. They can cut through box walls and injure anyone who reaches into a box without knowing what is inside.
Packing Knives the Right Way
- If your knives are in a knife block, wrap the entire block in several layers of packing paper and pack it upright in a box with padding on all sides. This is the easiest and safest approach.
- For individual knives without a block, fold a thick piece of cardboard over each blade and tape it securely before wrapping in packing paper. Never leave a bare blade loose in a box.
- Label any box containing knives clearly on the outside: KNIVES — OPEN CAREFULLY. This is not optional — it protects movers and protects you at unpacking.
Packing Bakeware
- Sheet pans and baking trays can be packed on their edge, stacked vertically like records, with paper between each piece.
- Glass baking dishes require the same treatment as regular dishes — individual wrapping and careful cushioning in a dish box.
- Muffin tins and cake pans can be nested with paper between them and packed in medium boxes.
Step Seven: Pack Small Appliances
Small appliances are among the trickiest kitchen items to pack because of their irregular shapes, detachable parts, and delicate components. A system for keeping parts together is essential.
How to Pack Common Small Appliances
- Original boxes are ideal: If you kept the original packaging for any appliance, use it. Original boxes are designed to fit the appliance perfectly and provide the best protection available.
- For appliances without original packaging: Wrap the main unit in bubble wrap, then in packing paper. Detach all removable parts — blades, carafes, bowls, lids, and attachments — and wrap each one separately.
- Keep parts together: Place all wrapped components for a single appliance into the same box, or seal them in a large zip-lock bag and tape it to the wrapped appliance before boxing.
- Coil cords loosely: Never wrap a cord tightly around an appliance — this stresses the cord at its connection point. Coil it loosely and secure it with a velcro strap or a twist tie.
- Stand mixers and food processors: These are heavy enough to require their own small box. Wrap the bowl and all attachments separately and pack them around the main unit with generous padding.
- Coffee makers: Empty the water reservoir completely before packing. Remove and wrap the carafe in bubble wrap. Pack filters and other accessories in a small bag attached to the main unit.
- Toasters and toaster ovens: Empty all crumb trays before packing. Wrap in packing paper and pack upright in a medium box with padding on all sides.
Step Eight: Handle the Refrigerator and Large Appliances
The refrigerator is typically the last kitchen item to be dealt with before a move — and it requires preparation that must begin at least 24 to 48 hours in advance, not on moving morning.
Refrigerator Preparation Checklist
- Use up or discard food: Plan your meals in the final weeks of your move to empty the refrigerator as much as possible. Anything remaining that cannot be transported safely should be disposed of or given to neighbors.
- Turn off and defrost 24 to 48 hours before moving day: Most refrigerators need this much time to defrost fully. A wet refrigerator loaded onto a moving truck is a problem for the floors and for any items stored beneath it.
- Clean the interior: Wipe down all surfaces once defrosted to prevent mold from developing during transit.
- Remove and secure shelves and drawers: Glass shelves and produce drawers can shift and break during transport. Remove them, wrap them in packing paper, and transport them flat or secure them with tape inside the unit if they are not removable.
- Leave the door ajar during transport: If the move is longer than a few hours, leaving the refrigerator door slightly open prevents mildew from forming inside. Ask your movers how they prefer to handle this.
- Allow the refrigerator to stand upright before restarting: After being moved, a refrigerator should stand in its upright position for the same number of hours it spent on its side during transport before being plugged back in — this allows compressor oil to resettle properly.
Step Nine: Pack the Remaining Kitchen Items
Once the major categories are handled, work through the remaining kitchen contents systematically. Drawers full of miscellaneous utensils, cleaning supplies under the sink, and dish towels all need attention before moving day.
- Utensil drawers: Group utensils by type, wrap them in bundles using rubber bands, and place them in a box with paper padding. Sharp utensils like cheese graters and zesters should be wrapped individually.
- Dish towels, oven mitts, and linens: These make excellent packing material. Use them to wrap items in the same box, or pack them loosely in a medium box. They weigh almost nothing and compress easily.
- Cleaning supplies: Check every bottle under the sink for leaks before packing. Place bottles upright in a separate box lined with a garbage bag in case of spills. Do not pack cleaning chemicals in the same box as food items or kitchen linens.
- Cutting boards: Pack on their edge in a medium box with paper between each board.
- Small items and miscellaneous: Bag small loose items — twist ties, jar lids, rubber bands, spare batteries — into zip-lock bags labeled by category before placing them in a box.
Final Walkthrough: What to Check Before the Truck Arrives
The night before your move, do a complete walkthrough of every kitchen cabinet, drawer, shelf, and corner. It is remarkably easy to leave behind items stored in high cabinets, pushed to the back of deep shelves, or tucked into rarely opened drawers.
- Open every cabinet door and every drawer — do not assume a space is empty because you do not remember putting anything in it.
- Check the top of the refrigerator, the space above cabinets, and any hooks or magnetic strips on the walls.
- Confirm the refrigerator has been emptied, defrosted, and cleaned.
- Make sure every box is sealed, labeled with contents and destination room, and marked FRAGILE where appropriate.
- Set aside one small open box or bag for the last-day kitchen items you will use that morning — coffee maker, a mug, paper towels, dish soap — and plan to load it last so it comes off the truck first.
A well-packed kitchen is one of the most satisfying parts of a completed move. The effort you invest in wrapping, labeling, and organizing before moving day pays off directly when unpacking goes smoothly and nothing is broken.